Ubuntu 上 Docker 容器安装 WordPress
In this tutorial, we will install WordPress by using multiple docker containers. WordPress itself in one container and the MariaDB database in another container. Then we will install Nginx on the host machine as reverse proxy for the WordPress container.
Docker is an open source project to make developers and sysadmin easier to create, deploy and run distributed application inside a docker container. Docker is an operating-system-level virtualization, you can create system isolation for your application with docker for the application that is running inside the container. You can create hundreds of docker containers inside your server, the number depends on your machine hardware.
Prerequisite
- Ubuntu 15.04 – x86_64
- Root privileges
- Docker knowledge
Step 1 – Install Docker
In this step, we will update the Ubuntu repository and then install the latest version of docker.io.
Become root user for the next steps:
sudo -s
Update the Ubuntu repository:
apt-get update
Now install the Docker packages with the apt command below:
apt-get install docker.io
When the installation has finished, start docker and add it to run at the system boot time with the systemctl command:
systemctl start docker
systemctl enable docker
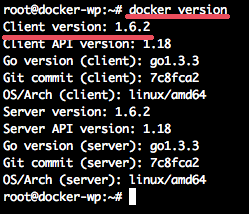
Next, check the Docker version with this docker command:
docker version
docker run hello-world
Docker installation is finished.
Step 2 – Setup the MariaDB Container
In this step, we will download a new MariaDB images from the docker registry and create a new container based on that image. We will configure a new database and user for the WordPress installation.
Download the Docker MariaDB image to the system with the Docker pull command:
docker pull mariadb
Now you can see the new docker MariaDB image with the command below:
docker images

Next, create a new container from the MariaDB image for the WordPress installation. Before creating the new container, create a new directory for the WordPress data, database directory, and the WordPress code directory.
mkdir ~/wordpress
mkdir -p ~/wordpress/database
mkdir -p ~/wordpress/html
Now create the new MariaDB container with name ‘wordpressdb’ with the command below:
docker run -e MYSQL_ROOT_PASSWORD=aqwe123 -e MYSQL_USER=wpuser -e MYSQL_PASSWORD=wpuser@ -e MYSQL_DATABASE=wordpress_db -v /root/wordpress/database:/var/lib/mysql –name wordpressdb -d mariadb
If there is no error, you can see the results below:

Parameter explanation:
- MYSQL_ROOT_PASSWORD = configure the password for the MySQL root user.
- MYSQL_USER = create a new MySQL user ‘wpuser’ for the WordPress database.
- MYSQL_PASSWORD = set the password ‘wpuser@’ for the user ‘wpuser’.
- MYSQL_DATABASE = create a new database for the wordpress installation with name ‘wordpress_db’.
- -v /root/wordpress/database:/varlib/mysql = linked database directory to the mysql directory ‘/var/lib/mysql’ on the container to ensure data persistance.
TheMariaDBriadb container has been created, now check the new user and the database for the WordPress installation to ensure there is no error with command on top.
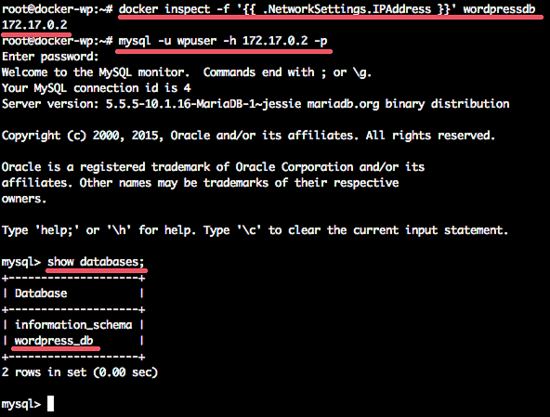
From the host machine, check the wordpressdb container IP address with docker command below:
docker inspect -f ‘{{ .NetworkSettings.IPAddress }}’ wordpressdb
Next, connect to the wordpressdb container with mysql command from the host system:
mysql -u wpuser -h 172.17.0.2 -p
TYPE PASSWORD: wpuser@
Check new database ‘wordpress_db’:
show databases;
All results:

The new Docker container, MySQL user, and the MySQL database for WordPress have been successfully created.
Step 3 – Setup the WordPress Container
Once the database container has been created, download the latest WordPress docker image with the docker pull command:
docker pull wordpress:latest
When the download has finished, create a new container from the images with the name ‘wpcontainer’.
docker run -e WORDPRESS_DB_USER=wpuser -e WORDPRESS_DB_PASSWORD=wpuser@ -e WORDPRESS_DB_NAME=wordpress_db -p 8081:80 -v /root/wordpress/html:/var/www/html –link wordpressdb:mysql –name wpcontainer -d wordpress
You can get the result as below, or you can check that the new container named ‘wpcontainer’ has been created.
Parameters:
- WORDPRESS_DB_USER = define database user ‘wpuser’ for the wordpress db.
- WORDPRESS_DB_PASSWORD = password ‘wpuser@’ for the database user ‘wpuser’.
- WORDPRESS_DB_NAME = name of the database ‘wordpress_db’ created on step 2.
- -p 8081:80 = mapping the port 80 on the container to port 8081 on the host.
- -v /root/wordpress/html:/var/www/html = Linking the web root directory ‘/var/www/html’ on the container to the local host directory ‘wordpress/html’.
- –link wordpressdb:mysql = linking the mariadb container ‘wordpressdb’ to the new continer wordpress ‘wpcontainer’.
To see the WordPress container running, you can check it with the curl command on the host IP and port 8081.
curl -I 192.168.43.99:8081
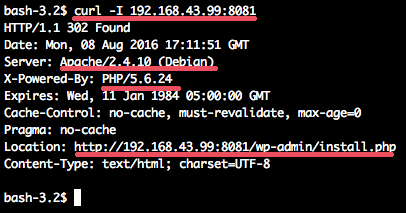
You will see the results:
- The web server is Apache, running on the Debian.
- PHP 5.6 is running in the container.
- You see the redirect to the WordPresss installation.
Step 4 – Install and Configure Nginx as Reverse Proxy
In this step, we will install the Nginx web server on the host system. We will configure Nginx as a reverse proxy for the Docker container ‘wpcontainer’ on the port 8081.
Install Nginx with the apt command on the host system:
apt-get install nginx
Next, go to the Nginx directory and create a new virtual host configuration for the WordPress container.
cd /etc/nginx/sites-available/
vim wordpress
Paste virtual host configuration below:
server {
listen 80;
server_name wordpress-docker.co www.wordpress-docker.co;
location / {
proxy_pass http://localhost:8081;
proxy_set_header Host $host;
proxy_set_header X-Real-IP $remote_addr;
proxy_set_header X-Forwarded-For $proxy_add_x_forwarded_for;
}
}
Save the file and exit.
Now, activate the new WordPress virtual host and delete the default virtual host configuration.
ln -s /etc/nginx/sites-available/wordpress /etc/nginx/sites-enabled/
rm -f /etc/nginx/sites-available/default
rm -f /etc/nginx/sites-enabled/default
Restart the Nginx web server:
systemctl restart nginx
Step 5 – WordPress Installation
Open your web browser and visit the domain name on the nginx configuration ‘www.wordpress-docker.co’ and you will be redirected to the WordPress installation.
Type in your site title, admin username, and password, then click Install WordPress.

Now click on ‘Login WordPress’ and fill in the username and password that you have chosen above, you will see the WordPress dashboard.
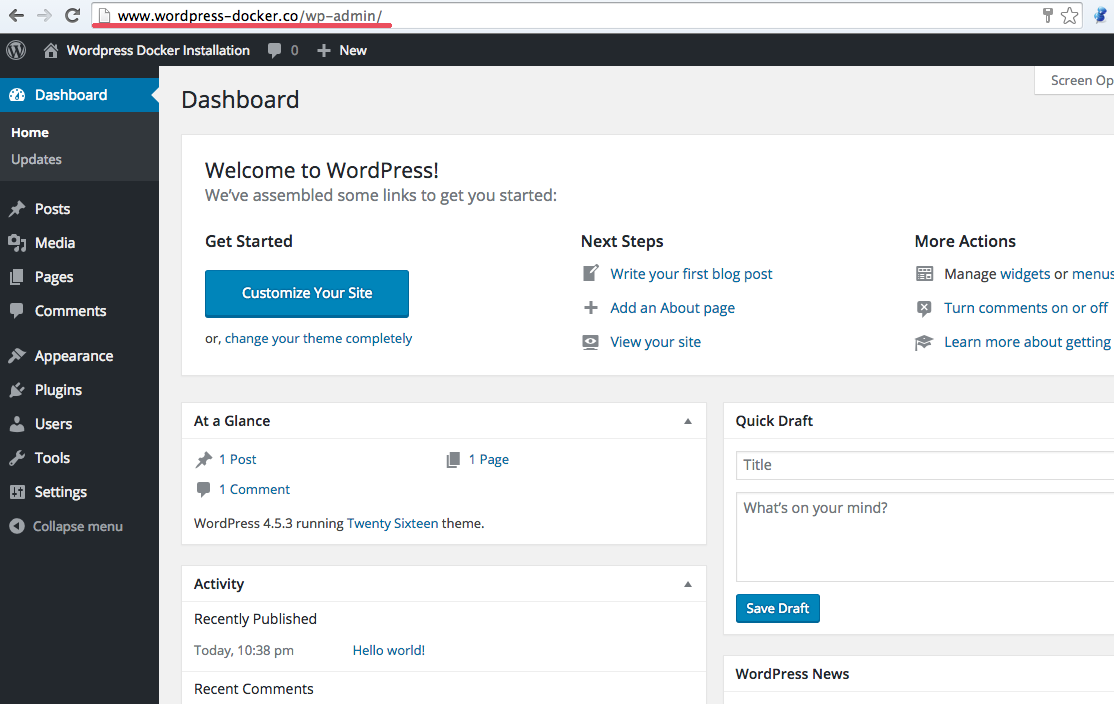
Or you can see the WordPress home page below:
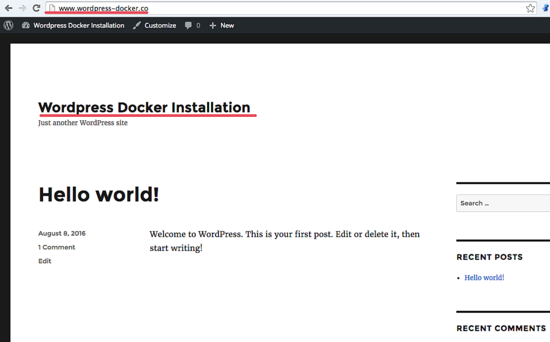
The WordPress installation with a MariaDB container and a WordPress container has been successful.
Reference
- https://hub.docker.com/_/wordpress/
- https://hub.docker.com/_/mariadb/
- https://www.howtoforge.com/tutorial/docker-installation-and-usage-on-ubuntu-15.04/
转自:https://www.howtoforge.com/tutorial/how-to-install-wordpress-with-docker-on-ubuntu/
| 投稿作者 | 作者网站 |
|---|---|
评论
为您推荐


请支持IMCN发展!
| 微信捐赠 | 支付宝捐赠 |
|---|---|
 |
 |


还没有任何评论,你来说两句吧